

III. The Middle Bridge
I decided to build "The Middle Bridge" first of all modules as I think it is one of the most interesting pieces in Mordheim. The
single possibility to cross the river dividing the city should provide a good mission objective for some nice scenarios.
I will add to this page as the "Middle Bridge" takes shape rather than start a new page every time. To facilitate navigation, I will sub-divide the page by date. You will find a new
page for each new grid square I start.
Sept., 17th, 2008
Okay, so here's the first update. I have made up the base of my first module by cutting down two sheets of Styropor (white foam) to match the size of a high density fibre wood
board (one square meter). This was then covered by an additional layer of Styrodur (blue foam). Thus, I ended with a base that's 8 cm thick of which the top 3 cm are blue foam. Note that I did
not glue this to the wood yet.

I roughly marked the streets, the position of the bridge and cut out the banks of the river. I used
a Proxxon thermosaw for this. That's the reason why the foam had not been glued to the wood before. Now, after finishing the ravine for the river, I stuck the foam sandwich to the wooden
baseboard.
As the PVA will take a long time to dry between the layers of isolation material I let the piece settle for a weekend before returning to work on it.

Next thing was to cover the cut edges of the river bank with filler. I applied the stuff about 1.5 cm
thick. Later I will carve stone structures into this, so it needs to be that thick.

Unfortunately 1.5 cm of joint compound needs its time to dry, so I had to wait again...
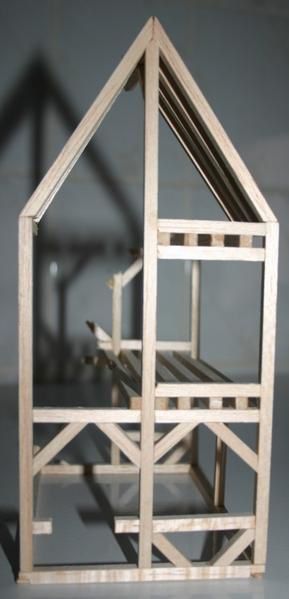
While waiting for the filler on the base board to dry, I started to make a first building ruin to go on the board. The frame of the building is made from balsa wood. The gaps will be filled in
with cardboard and a very thin layer of filler or maybe sand mixed with PVA. So here's what I've done so far:

Oct., 5th, 2008
This will be only a minor update as I didn't have much time to work on the project lately.
I started to carve the rock structure out of the filler along the river banks. I use a Proxxon Micromot 50/E for this but a Dremel tool would do the job as well.
First, I make deep lines to form the individual rocks. Then I roughen the surface of the blocks by touching again and again with the chamfer. I use a spheric tool for these two steps at a speed
of approx. 6000 rpm. In a third step I use an "egg-shaped" cutter to add smaller cracks and strata lines to the rocks. To avoid that these become to deep I reduce the speed to about 5000 rpm.
Here's an overall impression of the rock face:

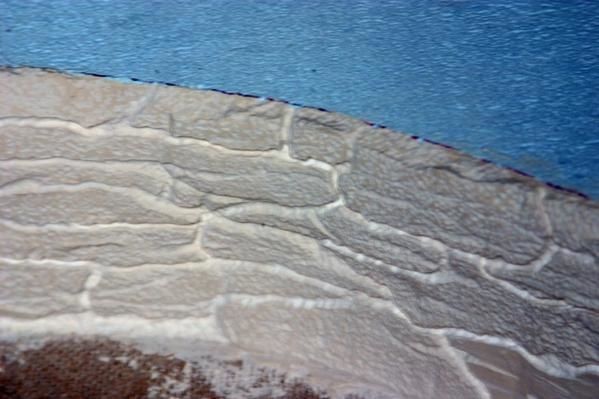
On the following close-up you can clearly see the difference between the finished rock surface and the
original filler (lower right corner). The structure which is achieved by stippling the surface with the cutter becomes obvious as well:
As you can see work on the river banks progresses even though it's much slower than I first thought. To finish it will take at least anther two weeks...
Nov., 25th, 2008
Well, it's been quite a while since my last update and I have to say sorry for letting you wait that long. I am about to finish my PhD thesis and started applying for a new job, so there's been a lot going on that kept me from taking care of this blog. Fortunately, it did not completly keep me from working on the board, so there are, after all, some news:
I have finished the river banks with all strata lines and outcrops. They are ready to be painted. I also
started to lay down the cobblestone roads on the board, as you can see on these pics:


The cobblestones are 0.5 cm square cardboard tiles, cut out and glued down individually. I spent hours and hours during the last weeks cutting several thousands of these to have a stock to complete the roads. They will be finished in the same way as the small bases for my accessories.
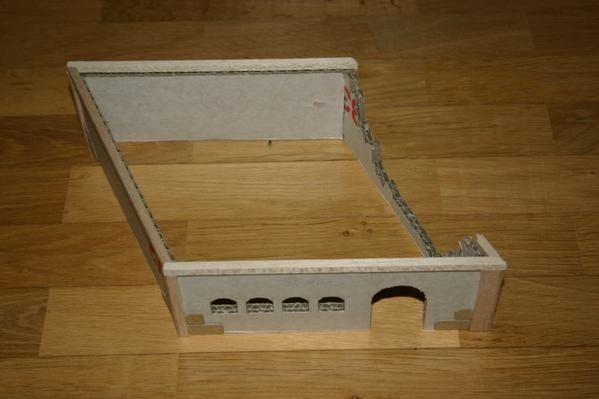
As you can see on the next picture I have also started work on the Middle bridge itself. The core is made from cereal cardboard and white foam while the tower, the gate and the exterieur of the bridge are made from blue foam.

There will be the ruin of a second tower on the other side of the river. As you can see in the close-up, the stone structure is simply carved into the blue foam. I hope this looks okay once it's painted.
The same method has been used to add some details to the ruin of the timber framed building I presented earlier. I filled the gaps between the timbers with pieces of blue foam and added some fishbone brick pattern and some broken away plaster beneath one of the windows:

Building a complete ruin this way is rather time consuming but I want some ruins with an exposed framework on the inside as well. However, to speed up the construction of my ruins most of them will not have the beams exposed on the inside.
I hope you like this so far. I'll try to get enough stuff done to post another
update before christmas.
Dec., 24th, 2008
I wish all my readers a merry christmas! There will be an update Dec. 28th or 29th.
Until then, yours Sir Patrick.
Dec., 29th, 2008
As I promised here's my next update. I have finished the writing of my PhD thesis and although I'll have to pass one final exam at the end of January I hope I can spend a little more time working
on the board.
I spent my christmas holydays working on the ruin of a tavern to be placed next to the bridge. The core of the building is made from double layer corrugated cardbord. wooden framework has been
added using balsa wood stripes.
To cover the gaps of the cardbord a mix of fine sand and PVA was added to the places where the wall has collapsed and masking tape was used in the door and window openings.

Next I added beams to support the ceiling of the ground floor and an internal wall to separate what will be the kitchen from the rest of the tavern. In the upper left corner you can see the first boards of the upper floor in place. Note the "stonework" of the archway and below the windows made from card and matchsticks. On the ruined wall of the upper floor I added a pole that will later hold a sign stating the taverns name.

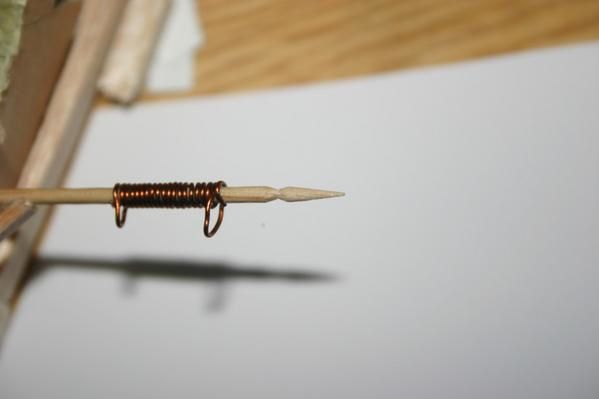
Here's a close-up of the pole. It's made from a toothpick using a hobby knife to cut the lancetip. Copper wire was used to make eyes to which the chains holding the tavern-sign will be hooked later.
Next, I made a door for the arched main entrance of the tavern. I used small stipes of balsa wood and cut them at an ankle to match the arch of the doorway. A handle was made from a short length of a toothpick and a small piece of balsa. The hinge is made from a thin stripe of cardboard. As the door will be placed as if broken away the second hinge will be glued to the wall but not to the door...

Today I built a stairway to the upper floor.

I will get this in place tomorrow and then start to lay some floorboards. Also, I will add a backdoor to have some sort of privy at the backside of the tavern...
Jan., 14th, 2009
I have started to paint the tower of the middle bridge. I tried to give the impression of fieldstone being the building material so I used three different browns and a single mid grey as colours.

I added a gate made from balsa wood but didn't paint that yet. Even if the the tower is not drybrushed or anything like that I am not really happy with how it turns out. I don't think I'll leave it the way it is... even if this means to start with a new tower.
I made some progress on the two ruins as well, so these will soon see some painting too. Hope to have some more pictures for you by the upcoming weekend.